NSCAVE Home Theatre System Upgrade Tips
Lots of web sites have tips for what equipment to use, how to set it up properly and that sort of thing. Our purpose is to point out some of the little things that make a a job a lot easier.
Home Theatre Installation Tips

* Brace & Bit - This good old fashioned tool is best for drilling holes through floors, beams, etc. when installing wires. We tend to like to use the electric portable drills, but the brace & bit cuts faster, deeper and does the job better. Get one if you don't have one.
* Make a diagram. When you build a system, make sure you have a diagram to go by should the thing fail. Tracing those wires later is next to impossible. Be it a block diagram or a schematic type - either is worth its weight when you need it.
Take Pictures - Nearly everyone has a digital camera now days. Take lots of pictures when wiring your system,and store them on your computer. You can always print a page it you need to.
You can take pictures and store them as jpg files which work pretty good. I prefer to use Word or some similar program, add the pictures, some descriptive text, then save the whole thing as a pdf file.
Take a pictue of all the connections on the back of your equipment. You will no longer need to squint and use a magnifying glass or mirror to see where the connections are.
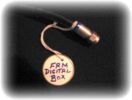
* Label the wires as you go. Sounds simple enough, but most people don't until its too late. I tried the stick on label maker type and they always seem to fall off. Coloured tape is much the same and it fades or comes off when you move the wires around. The best thing I found over all is the little round tags with the string on them that you can loop around the wires and secure by pulling the button through the string. Then write on them with a marker. They stay on and are easy to read, and they only cost pennies for a bunch in a package. .
* Speaker wire - Sometimes it is good to use the nice fat professial cables. I always do between equipment. However for long runs in between walls I have found lamp cord to do just as good a job with minimal losses. Get the heavy guage stuff, and be aware it is not shielded, otherwise save yourself a bundle.
For neatness use cable ties. Neatness counts, and you can be very professional looking by taking your time and using some of these.

Nylon Cable Ties - These come in various colours and sizes. In fact, packages of various sizes are available at 'dollar' stores.
You can easily snip them off with wire cutters should you have a wire/cable change later on.
It is better to cut the end off for neatness rather than leave it long as shown in the picture.

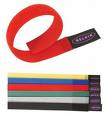
Velcro Cable Ties - Velcro ties also come in various sizes and colours. They are also available at most dollar stores and have many uses.
These are very useful for cables that are changed often, such as those plugging directly into the amplifier or TV display unit.
They are also very useful for portable items. Power supply cables for your laptop, audio/video cables for you laptop, and power brick cables that have to be stored, then used again, are only a few examples.

Head Light - These come in various forms and are the handiest thing you can imagine. They are an LED light with straps attached the pull over your head. LEDs are very bright, and the batteries to run them last for hours.
Ever try to hold a flashlight to read the connections on the back of your home amplifier or TV set? Hard to plug the cables in at the same time isn't it? Works for inside and behind desktop computers too - everywhere.
You don't have to do that anymore. Just pull on your headlight and things will look a little brighter.
